For the 2002 model year (from 9/1/2001 production), the BMW E39 came standard with an emergency trunk release handle. Six components need to be installed or replaced to bring this feature to older E39s. This article details the steps that must be completed in order to retrofit the emergency release handle. Please see the video at the bottom of this post as well.
Objective: Retrofit emergency trunk release handle to a BMW E39 5-series.
Applicable Vehicles: 1997-2001 BMW E39 5-series: 520i, 523i, 525i, 528i, 530i, 535i, 540i, M5. Information from this article can also be applied to the 1994-2001 BMW E38 7-series: 730i, 740i, 740iL, 750iL, and the 1999-2006 BMW E46 3-series: 323i, 325i, 328i, 330i, M3.
Subject Vehicle: 02/2000 BMW E39 M5, DE93 USA.\
Parts Required: DISCLOSURE: This post may contain affiliate links, meaning when you click the links and make a purchase, we receive a commission.
PART NUMBER, QUANTITY, DESCRIPTION, PRICE:
51247056411 1 Bowden Cable $22.85
51247056414 1 Handle $11.35
51247057739 1 Washer $4.00
51247056413 1 Clip $3.81
51247068428 1 Bar Support $1.05
51247069903 1 Cover $2.41
Showing 1 to 6 of 6 entries
The above prices are quoted from ECS Tuning when available. Other vendors may vary in pricing. Used parts will always be a cheaper alternative. Figures updated June, 2020.
Tools Required:
Flat head screwdriver
Phillips head screwdriver
Torx T30 driver
Sharp knife
Tape measure
Difficulty: Easy. Cut precise hole in trunk lid carpeting.
Time: 1 hour.
Procedure: Please watch the full video that is at the bottom of this post. It contains much more detail than this textual overview. This DIY requires 3 different jobs to be completed. I will outline each one, A – C.
A) Remove trunk lid plastic trim
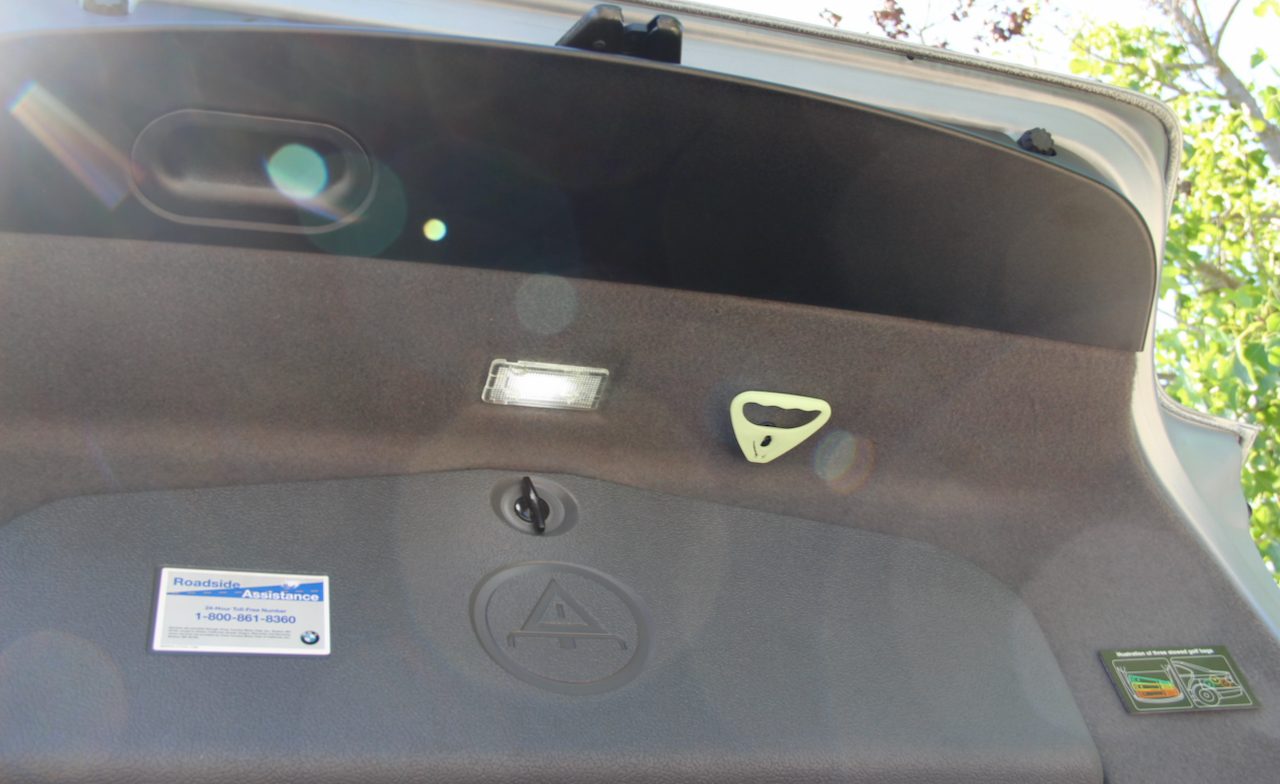
With the trunk lid open, we can see black plastic trim surrounding the trunk lid latch. This is held on with seven fasteners, and must be removed. Firstly, pry out the two plastic pop-rivets on the outer edge. The center plunger pries out first. Next, inside the handle on the left side, there is a cover that shields a Phillips head screw. Remove both the cover and screw. There are now four plastic clips that hold the trim onto the trunk lid. Carefully pry the trim down off of the trunk lid.
B) Install the handle in the trunk lid carpet trim
The glow-in-the-dark emergency release handle will be mounted on the trunk lid carpet. Four of the six required parts for this job are used for this. You must first determine where the hole should be cut. With the trunk lid trim and light carefully removed, measure 4 7/8th inches to the right (passenger’s side) from the bottom right corner of the light cut-out. This will be the top center of the cut-out. The cut-out must now go down 1 inch (height), and across 1/8th inch in each direction, for a total width of 1/4 inch. The OEM cut-out features a rounded top and bottom, and a small divot in the 6:00 position on the bottom. Using a box-cutter with a freshly installed blade, I made my cut-out more of a rectangular shape, until I could install my clip in a way that allowed it to snap firmly into place without distorting the carpeting and having it list to either side. You will now place the cover on the back side of the carpet around the hole, with the curved flange matching the shape of the bend in the trunk lid carpeting. Next, the washer installs from the back side, sandwiching the cover between the clip and washer. Press them firmly together. Note that the nub on the washer faces you, standing at the back of the car. The bowden cable will feed through the carpeting and washer to connect to the handle. The handle then connects to the nub on the clip.
C) Install the bowden cable
The trunk lid latch is held to the trunk lid with three T30 screws. Release all of these screws and allow the trunk lid latch to gently pull out of its seat. If your latch was produced before 9/01/2001, you will need to replace the bar support on the actuator motor. The bowden cable will now snap around the motor actuator in a groove and the hammer end of the bowden cable will slide into the bar support. The bowden cable will now travel towards the passenger’s side of the vehicle, drop down one level in the trunk, clip to the body work of the interior of the trunk lid, and then feed through the hole in the clip. The hammer on this end of the bowden cable will snap into the handle, which will then snap onto the clip.
E39Source Full DIY – BMW E39 Emergency Trunk Release Handle Retrofit