The shifter is one of the most touched parts of the vehicle. If you own your 5-series long enough, you will probably want to replace it. What are the correct part numbers? Which one does your vehicle need? How do you change it?
Objective: This article will detail the replacement of the manual shift knob found in a BMW E39 5-series. A video of wiring an M5 shift knob is embedded at the bottom, as well as wiring an M shift knob into a non-M BMW.
Applicable Vehicles: 1996-2003 BMW E39 5-series: 520i, 523i, 525i, 528i, 530i, 535i, 540i, M5.
Parts Required: Shift knob, shift boot. Note that M5’s have illuminated shift knobs with the boot built in and will use one of these part numbers, depending on production date:
Vehicles with Bruyere Wood trim manufactured before 9/00: 25112229055.
Vehicles with Bruyere Wood trim manufactured on or after 9/00: 25112282202.
Vehicles with Titan Line trim, manufactured before 9/00: 25112282402.
Vehicles with Titan Line trim, manufactured on or after 9/00: 25112282400.
Shift knobs for non-M vehicles, or un-illuminated parts can be found from ECS Tuning.
The only difference in parts before and after September, 2000 is the the wiring harness. If you own an M5 and thus have an illuminated shifter, the connector changed. When I replaced my shift knob, the old-style wiring harness parts were not available for purchase. All I had to do in that case was cut the wiring plug off of my old shifter, cut the one off of the new shifter, and splice the like wires together.
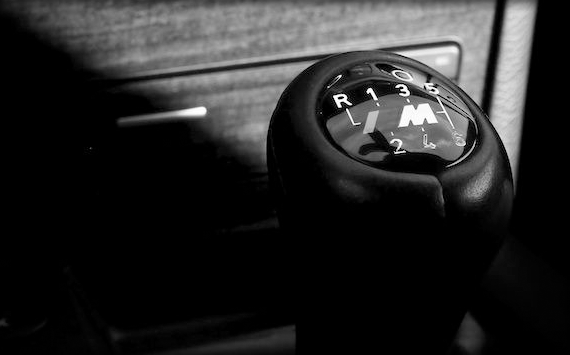
Original 2000 M5 Shift Knob
The pre-facelift (pre-9/00 production) M5s with the sport interior and Titan trim came with a different shift knob altogether. They attempted to mirror the Titan trim finish in the shift knob (and e-brake handle). Owners of these cars and dealers very quickly found out that the finish wears off almost instantly. BMW quickly decided to wrap the sport shift knobs and e-brake handles in leather, and discontinue the Titan components. The Titan parts above are the post- facelift (9/00 production) fully leather wrapped pieces.
Difficulty: Easy.
Time: Less than 15 minutes.
Procedure:
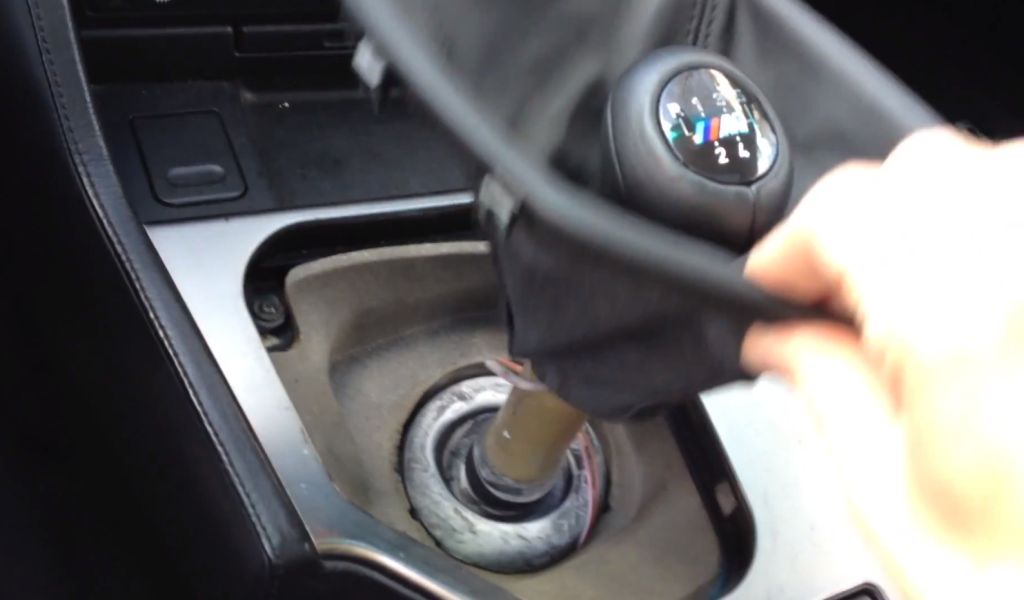
We must first remove the old shift knob. If your part has never been removed before, this may be difficult. Start with the leather shift boot. This is held in the center console trim with a few clips. Press towards the knob on the right and left sides of the boot, and pull up.
Shift boot pulled up from center console trim
Now we must take the shift knob off of the actual metal shift lever. I ended up sitting on top of my center console arm rest, putting my head out of the sunroof, and pulling almost as hard as I can. If you’re in an M car, unplug your wiring first so you don’t pull the wiring harness out with it. Otherwise, it should just come straight off with enough force. There is no unscrewing required.
Installation is easier. In the M5, plug the wiring in as it was before, line the shift knob on-top of the level, and hit it with the palm of your hand. Make sure it’s correctly lined up and straight, and it should snap on to the shift lever. Now push the corners of the boot back into the console, straighten out your leather, and enjoy your refreshed interior.
Wiring an Illuminated M Shift Knob to a non-M vehicle:
Colton has an illuminated M5 shift knob in his 2001 BMW 540i/6, and it works just as one in an M5 would. This is not at all difficult, but will require some extra time and wiring. Since only the M5 has the wiring adapter already there for the knob, we’ll have to take our 12 volts from somewhere else. The easiest place will be the ashtray illumination. To obtain this wire, the center console must be removed.
Start in the rear seat, and pull the cup-holders or small cubby straight out. A flat pry tool should do the job. With that out of the way, pull the vents down and out. We have now revealed two of the seven screws to remove the center console. Unscrew the two black phillips screws that hold the arm rest in, and then pull the arm rest up and out towards the back seat. This reveals two more screws at the rear of the center console, that were previously covered the arm rest. The next two screws to remove the console are underneath the shift boot. If yours is not out yet, push towards the shift knob on the sides of the boot, and pull up. The two screws are in the top corners around the shifter cut-out. With the shift boot out, reach under it and push up on the central locking button and hazard light switch, they will pop straight up, revealing the last screw (this one is brass). Unplugging these two buttons from their wiring harnesses will be necessary to remove the center console. The only thing holding it in now is a plastic wiring clip in the top left of the console, nearest the steering wheel, and the purple wire that goes to the ashtray light. Simply twist the wiring harness on the top left of the console about 30 degrees, and pull it free from the console. The ashtray light will pull out of the console.
Now splice open the purple ashtray light wire, and add in your shifter. Vampire taps are best here. You will need to test the power when you have it connected with your fingers to make sure that the wires are on correctly. Colton did need to find a length of similar-guage wire to bridge the shifter in.
2000-2003 BMW M5 Shift Knob Replacement:
1997-2003 BMW E39 5-Series M5 Shift Knob Retrofit and Wiring: