A serpentine, or accessory belt, is a part shared by all internal combustion piston engines. Knowing how to replace one would be a valuable skill for anyone to have. This article walks the reader through each step required to replace either the serpentine or AC belt on the BMW M52 inline 6-cylinder engine.
This post was submitted to E39Source by Brian M
Objective: Replace serpentine belt and/or AC belt on M52 I6 powered BMW.
Applicable Vehicles: 1997-1999 BMW E39 5-series: 520i, 523i, 528i. 1994-2000 BMW E36 3-series: 320i, 320Ci, 323i, 323Ci, 328i, 328Ci, 328is. 1999-2000 BMW E36/7 Z3-series: Z3 2.0i, Z3 2.3i, Z3 2.8i. 1995-2000 BMW E38 7-seriers: 728i, 728iL.
Parts Required:
AC Serpentine Belt (17mm x 905 mm; 21/32” x 35-5/8”) Gates K050350
Main Serpentine Belt (20mm x 1569mm; 13/16” x 61-3/4”) Gates K060612
Tools Required:
Jack(s) and jack stands
Wheel chocks
Philips screwdriver (to remove belly pan)
90 degree pick (to remove tension bolt covers)
8mm Allen wrench (for AC belt tensioner)
16mm socket and drive (for main belt tensioner)
Cost: ~$45
Difficulty: Moderate
Time Required: 45-60 minutes
Notes:
The parts catalog used by my (excellent) parts supplier indicated that the main serpentine belt for this vehicle was a Gates K060815 (20mm x 2085mm; 13/16” x 82-1/8”), but my parts guy recommended that I also take the 1569 mm belt (specified above), since all of his other customers with this car used the shorter belt. The main serpentine belt is behind the AC belt, so it is nice to have the correct belt when you start. Return the belt that you don’t use.
My online research provided conflicting statements about the tools needed to move the belt tensioners. Various sources indicated that Torx 45, 47, 50, an 8 mm Allen, or a 16 mm socket were required. Also, there are two versions of the tensioner used on the vehicle. On mine, the AC tensioner was hydraulic, and required an 8 mm male Allen wrench. I could not determine if the main belt tensioner was hydraulic or spring actuated, but it took a 16 mm socket (female). Your setup may vary.
While some sources indicate that the belts are changed from the top, other sources recommend changing the belts from below. Since changing from the bottom only requires removal of the front plastic belly pan (9 screws), and changing from the top requires removing the coolant tank, fan, and fan shroud, I elected to change from below.
If the tensioners required a Torx male driver, it would have been pretty tight, since a Torx socket with ratchet might not have fit in the available space. One reference used a small pipe wrench to hold the outside of the Torx socket to untension the tensioner. Two alternate approaches I had considered were (1) removing the Torx “bit” from the socket, and holding it in a small box end wrench and (2) removing the bit and pressing it into the center of an appropriately sized nut (e.g., an M8 nut), and then holding the nut with a box end wrench. The latter approach had worked to remove a socket head cap screw (“Allen bolt”) from a fan pulley on another car, where there was only an inch between the fan pulley and the radiator.
Procedure:
Chock the rear wheels, set the emergency brake, jack up the car, and position the jack stands. (I used two floor jacks, one at each lift point behind front wheels, and two jack stands under frame members. I discovered that the previous owner had removed the main belly pan, so I had access to the frame rails behind the lower A-arm mounting points, which provided more room than the center lift point.)
Remove the 9 Philips head screws holding front plastic belly pan in place. These are “captured” screws, so they don’t fall out when removed, but remain attached to the plastic belly pan.
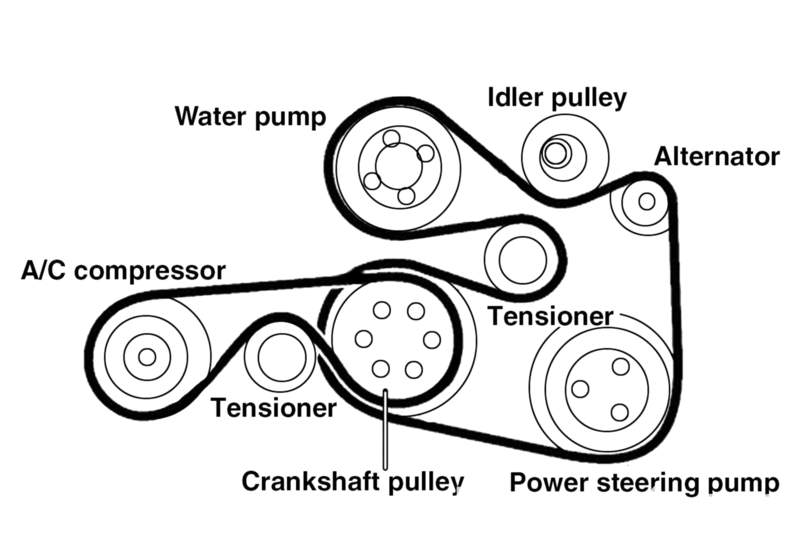
If you do not have one already, make a belt routing diagram for reinstallation. Even if you have a diagram, it is probably a good idea to make your own, the way you see the belts. It will save you misery later.
Using a 90 degree pick, pry off the plastic caps on the two tensioner pulleys. I could not get a straight-bladed screwdriver into the available space to do this, that is why I used a 90 degree pick.
nsert an 8mm Allen wrench in the center of the AC tensioner pulley. Rotate the tensioner pulley clockwise. That will permit the belt to be slipped off the Crankshaft pulley (the pulley on the right, as you look towards the rear of the car). Remove the belt.
Slip a 16mm socket and ratchet drive on the center bolt in the main serpentine belt tensioner pulley and, using a short cheater pipe if necessary, rotate the tensioner clockwise. This will permit you to slip the belt off the power steering pump pulley (the bottom right pulley, that is most accessible).
When you relieve tension on the tensioner, it will pinch the belt between the tensioner (which rotates back counter-clockwise a lot) and the idler pulley. To free up the belt, you will have to “un-tension” the tensioner a second time, to pull the belt out from between those two pulleys.
After getting the belts off of most of the pulleys, it will still be around the water pump/fan pulley. You have to push one side of the belt between the fan blades one at a time as you rotate the fan one complete revolution. The belt will then be in front of the fan, and can be removed. Pay attention to what you just did, since now you will have to do the exact opposite to get the new belt back around the fan.
This is the time to compare your old belt to your new belt. When I did this, the “correct” belt was about a foot longer than my old belt. I quietly thanked my parts guy for the great advice, since I had the correct belt available.
You now have to thread the new belt over the fan. I did mine counter-clockwise, by looping the belt around the bottom fan blade, keeping the right end of the belt in my right hand on the engine side of the fan, and slipping the left end of the belt between the fan blades and the shroud (so that the portion of the belts “slipped” was on the radiator side of the fan). By rotating the fan counter-clockwise, the left side of the belt could eventually wrap around the fan and water pump/fan pulley.
Perhaps the hardest part was seating the serpentine belt on the water pump/fan pulley. Again, the tensioner has to be “untensioned” and, pinching the belt together (grooved side to grooved side) push a good section of the belt upwards into the area around the water pump/fan pulley. Let go of the tensioner, and it will (again) pinch two layers of the belt between the tensioner and the idler pulley.
Inspect the belts where it is pinched, and make sure that it is centered on the pulleys. That will help align it on the water pump/fan pulley.
Also inspect to assure that you have enough slack in the belt looping around the water pump/fan pulley to permit moving the belt around.
I used a long screwdriver to poke the belt into place around the water pump/fan pulley. Space is tight, and it is awkward, but you can do it.
When the belt is correctly positioned on/around the water pump/fan pulley, “un-tension” the tensioner one more time and tug hard on the rest of the belt (looped downward to the ground). If things were done correctly, the belt should seat itself on the water pump/fan pulley, and the job is almost completed.
Route the belt around all the other pulleys, but leave it loose on the power steering pump pulley (the bottom one on the right, which is most accessible).
For a final time, “un-tension” the main belt tensioner, and slip the belt over the power steering pump pulley. It took me two tries, since I had to reposition my ratchet to give me enough clockwise rotation (to give me enough slack to get the belt over the power steering pump pulley).
Install the AC belt on the AC pulley and around the tensioner, but loosely on the Crankshaft pulley.
“Un-tension” the AC serpentine belt tensioner, and slip the belt onto crankshaft pulley.
Reinstall plastic dust covers on both tensioners.
Reinstall front plastic belly pan (9 screws).
Remove jack stands, lower car, and remove chocks.