BMW made constant changes to the E39 throughout production. I detail the majority of these changes this article. Some of the most distinctive updates were to the exterior lighting. The 2001 facelift brought new headlights, fog lights, and taillights to the E39. This article will detail the upgrade process from 1996-2000 lights to 2001+ lights.
BMW themselves do not manufacture lights. Most BMWs, including the E39, use exterior lights made by Hella. You’ll also find Hella lights on many other vehicles. You can buy the lights from BMW branded as Genuine BMW (if available), but these were in fact manufactured by Hella in Germany. Buying from Hella directly (if available) cuts out the middleman and reduces your cost by approximately 2/3.
There is a right way and a wrong way to go about replacing your lights. If you search Ebay for E39 head or taillights, you will find several cheap alternatives to what I recommend using. These cheap lights will quickly be recognized as counterfeit and incorrect. I made the mistake of installing Depo brand headlights on my M5 many years ago; I didn’t know better. They had writing all over the lenses, were not proportioned correctly, and had 5 individual LEDs in each halo ring which were clearly visible at night. The OEM (Hella) lights are much more elegant, provide a smoother, more even light, but are more expensive. Like anything else in life, you get what you pay for.
HEADLIGHTS
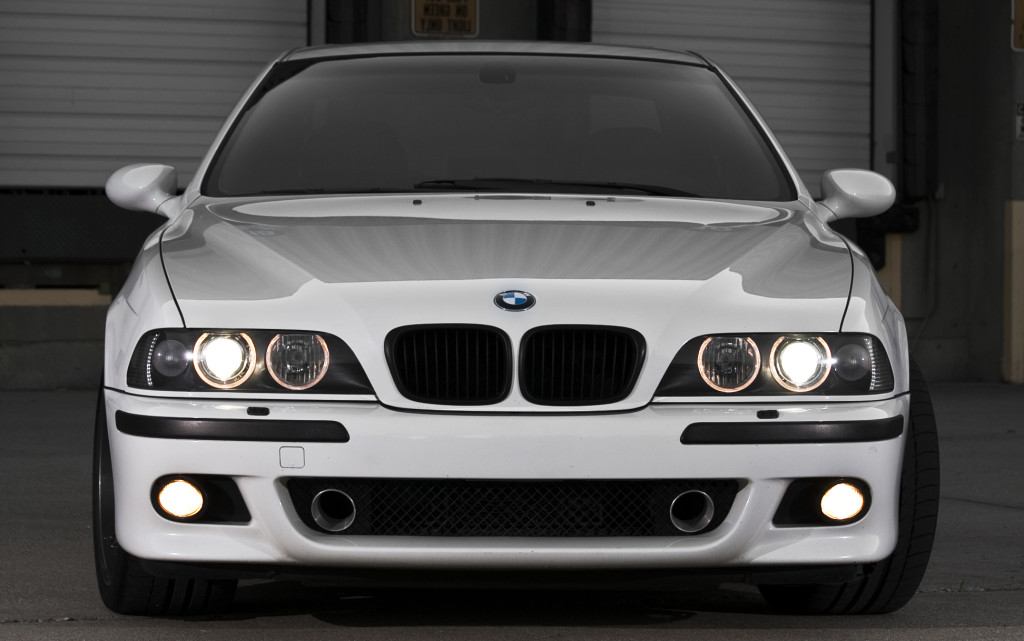
Options: Be aware that there are four primary versions of Hella facelift headlights that you can install. There are both American and European versions of both the standard (halogen) lights and the upgraded (xenon, option S522A) lights. The American lights are recognized by their amber side-marker and small LED inside of that marker. This was added in 2001 to meet new American DOT requirements that require the vehicle be more visible from the side at night. Since you’re changing them, you could elect to install the European lights which have no side-marker bulb and a beautifully clear/silver side lens without any amber reflectors. The choice is yours. I personally prefer the European style.
2001+ American, Xenon (S522A)
Left: 63126912439
Right: 63126912440
2001+ European, Xenon (S522A)
Left: 63126912435
Right: 63126912436
2001+ American, Halogen
Left: 63126902517
Right: 63126902518
2001+ European, Halogen
Left: 63126902425
Right: 63126902426
Availability
In late 2024, Hella discontinued all E39 headlights and incinerated the equipment used to manufacture them. This was a devastating blow to the E39 community as factory replacement lights were the cleanest way to upgrade to the facelift look. Since this news, I have been exploring rebuild options. Multiple vendors offer rebuilt E39 headlights, but I have yet to find anyone who offers a fully-stock rebuild service. It seems that everyone either wants to retrofit bi-xenon projectors or LED low/high beams to the lights. There are pros and cons associated with these updates. With the factory lenses also discontinued, we’ll need to make concessions as it comes to lens quality and appearance. Most aftermarket lenses have some DOT markings somewhere in the plastic.
BMW themselves still have some available inventory of some varieties of E39 headlights, though this is dwindling and not expected to be replenished. The only sustainable long-term option will be rebuilding existing headlights.
1996-2000 headlights are relatively easy to rebuild. The lenses can be removed by hand, giving you access to the projectors, bulbs, adjusters, etc. New aftermarket lenses can be purchased on Ebay. You can source the lens gaskets and rubber weatherstrips directly from BMW. If you’re removing the lenses, I highly recommend replacement of the fragile plastic adjusters at the same time. You can purchase aftermarket plastic or upgraded aluminum adjusters from many online parts vendors.
2001 headlights are harder to rebuild as the lenses are glued to the headlight housing rather than clipped on. Many forum posts will detail how to bake your headlights in the oven to soften the glue so the lenses can be removed. I’ve never considered placing any components of my vehicle in the oven.
2002-2003 headlights are the hardest to rebuild since they used ‘perma-seal’ to adhere the lenses to the housing, which is significantly more difficult to work with. Rebuilders will charge an additional fee to work with these later production headlights.
Please check back on this page in early 2026; I hope to have a recommended rebuilder or offer rebuilt lights for sale myself.
Installation: Headlight installation is relatively simple, just four 8mm screws and all of the wiring (disconnect all plugs before removing). If you find the signal bulbs hard to remove or unplug, you can do them as the headlight assembly starts to come out and you have more access to them.
Wiring: The original 1996-2000 lights have four plugs: low-beam, high-beam, turn signal, and the automatic-leveling connector (for vehicles equipped with option S522A, xenon lights). The facelift lights have those four plugs, plus a fifth connection for the halos (there is one halo bulb for each headlight that illuminates both halo rings). The low beams will be plug and play, just move the ballasts over to the new housings and connect everything. The turn-signal bulbs are different, since the pre-2001s had two-filament bulbs (one filament for signal, one filament for lights in position one/daytime running lights) and the post facelift lights use a single-filament bulb, just for signaling. So, for 1996-2000, the signal plug has 1x ground, and 2x power wires in the connector. The facelift lights need a signal bulb that has 1x ground and 1x power. You also need a new connector for the halo, with 1x ground 1x power. Split the ground wire from the original signal harness so it can be shared by both the halo and signal. You can solder or use a wire taps, adding approximately 10 inches of 16/18 gauge wire. Then determine which positive wire is for the signal, and which will control the halo. You can use a voltmeter for this to see which one pulses with the hazards on, and which one is constant with your headlight switch in position 1. Extend that wire approximately 10 inches to your new ground, and you have now created the power supply for the halo socket. The bright bulbs are different, but the sockets and wiring are the same. Screw your new lights in place and admire your work.
You can make your own Y-harness to simplify this wiring modification. You will need (2) 63120025497 and (2) 63120025499. You’ll need to do some cutting/splicing with these parts to make a suitable adapter for this application.
Automatic Headlights: More changes came for the headlight system in 2002 (starting 9/2001 production); automatic headlights were now standard on the E39. These too can be retrofit on earlier models. Please see this article for more details.

02/2000 E39 M5 with its original 2000 headlights.

02/2000 M5 with 2001+ European-style headlights.

Left: 2001+ headlights on a standard E39 5-series. Right: 1996-2000 headlights on a standard E39 5-series.
TAIL LIGHTS
The taillights make nearly as much of a difference as the headlights do. They’re also more affordable than the headlights. If you source used facelift taillights and attempt to install them to your early E39, you’ll find that they won’t fit your car. In 2001, BMW made the taillight buckets a bit deeper to accommodate the higher-tech CELIS lights. You may be able to make them fit with an extensive amount of re-forming (hammering), though I don’t recommend this. I installed the Hella retrofit kit taillights on my M5 in 2012 and modified the light buckets in the chassis as required. Since then, I’ve never been able to get the left light to seal to the body. If the car is driven in the rain or washed with a hose, the interior of my trunk gets wet. The left trunk cavity in particular is full of electronics that should never encounter any water/moisture. I have tried new gaskets, two gaskets, re-forming the body, all to no avail. Because of this, I do not recommend facelifting E39 taillights. If you have a standard (non-M5) E39, I do recommend installing the M5-specific pre-facelift taillights. They used a clear lens rather than amber for the signal which in my opinion is a cleaner look. Installation of these lights would be plug-and-play and require no wiring, fitment, or coding modifications on pre-2001 E39s.
2000 M5 Taillights:
Left: 63216902359
Right: 63216902360
Hella used to offer a retrofit kit specifically for pre-facelift cars, but these sold out in ~2022 and are not expected to be replenished. The retrofit kit used slightly different light housings designed to better fit the 1996-2000 E39 chassis. It included the required hardware, wiring, and ballasts. There was still some modification required for the light buckets, but it was minor in comparison to the 2001+ lights. I have a detailed installation video embedded below if you’re able to find a set of these second-hand.
Installation: Disconnect the wiring harnesses on the rear of your taillights and then turn the knob on the bulb carrier to remove it. Now remove the four 8mm nuts on each light. Pull your lights out from the rear and clean up the wells from dirt/debris.
Ballasts
There is a lot of confusion around the ballasts included with the Hella retrofit kit. They are only required when used with the Hella retrofit kit taillights. They are not needed with factory 2001+ taillights, and if used anyways will make your LED bars very dim. On the retrofit kit lights, the ballasts serve two jobs:
Adapt wiring. The 1996-2000 taillight wiring is different and must be adapted to the 2001+ style. The ballasts accomplish this.
Regulate CELIS LED voltage. The standard (non-retrofit kit) 2001+ CELIS LEDs use 12 volts, which is what the body harness provides. However, the retrofit kit CELIS LEDs operate at 10 volts, and 12 volts will rapidly burn them out.
For the retrofit kit specific lights, the kit includes one ballast for each taillight and a way to install them in the spare tire well on non-M5 E39s. If you’re doing this on an M5, simply install them behind the folding trunk panels on either side of the trunk. I just velcroed one to my CD changer (left) and the other on the inside of the fender (right). You will need to drill two new holes and carefully pound out some of your light buckets to make them fit properly. Take your time, be precise, and start with small pilot holes. Be sure to put some paint/clear over the exposed metal in the new holes to avoid corrosion. Avoid deepening the light buckets any more than absolutely necessary. Plug in the ballasts, fit the lights, and reinstall the 8mm nuts. Note that very little torque is required for these nuts.
To use the standard 2001+ lights (non retrofit kit), you will simply need the inline wiring adapters, part numbers 63120025517 (left) and 63120026771 (right). You can alternatively cut/splice in pigtails, or attach the newer style pins and socket housings.
Coding
In my experience, the lights work without errors without any recoding. My experiences have been limited to 2000 model year E39 M5s, with the LCM IIIA. LCMII cars may require coding. The LCM IIIA should have an option visible in NCS Expert called “LED TAILLIGHTS”. This should be set to active (aktiv) once the new taillights are installed.
European Style
A neat thing about this Hella retrofit kit is that they are European style taillights. In 2001, the US taillights incorporated four vertically arranged LEDs on the far outer edges of the lights to comply with a new DOT standard. Europe never got these out-of-place LEDs.

02/2000 M5 with its original 2000 tail lights.

02/2000 M5 half way through the install. The 2001+ style is on the right.

Installation completed!

LED bars illuminated.

No side LEDs

FOG LIGHTS
BMW changed both the standard 5-series and M5 fog lights for the 2001 model year (from 9/00 production). The standard 5-series got a whole new bumper, and with that came rounded fog lights to replace the older, square style. Facelifting the fog lights would require doing the entire bumper as well. The M5’s bumper remained the same, but the corrugated glass lenses were replaced with cleaner smooth glass lenses. The facelift M5 fogs are a direct plug-and-play install for the older cars.
2001+ M5 Fog Light, Left: 63177894017
2001+ M5 Fog Light, Right: 63177894018
2001+ Standard Fog Light, Left: 63176900221
2001+ Standard Fog Light, Right: 63176900222
E39Source Channel Update Video with Post Facelift Headlights
E39Source DIY to Facelift Headlights
E39Source DIY to Facelift Tail Lights
DISCLOSURE: This post may contain affiliate links, meaning when you click the links and make a purchase, we receive a commission.