This article will go over the required parts and steps to install a hard-wired factory BMW auxiliary input kit to your E39 5-series without factory navigation.
Objective: Install a factory BMW hard-wired auxiliary input cable to your 5-series.
Applicable Vehicles: 1997-2003 BMW E39 5-series (Without Navigation): 520i, 523i, 525i, 528i, 530i, 535i, 540i, M5.
DISCLOSURE: This post may contain affiliate links, meaning when you click the links and make a purchase, we receive a commission.
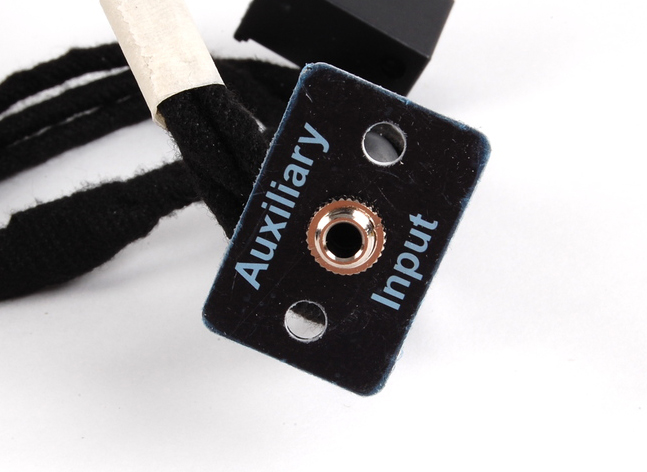
Parts required: OEM auxiliary input kit 82110149390
You may also need to upgrade your CD player to one with a build date later than 09/2002, see Prerequisites for more info
Tools Required:
Metric ruler
Drill
2mm and 10mm drill bits
Phillips Screwdriver
Flashlight
Torx T10 driver
Cost: $45
Difficulty: Easy
Time Required: 30 to 45 minutes
Prerequisites: Your vehicle must have a CD player with a build date of September, 2002 or later. Just because your car is a model year 2002 or above does not mean that this is the case. To check the build date of the CD player, follow steps 1-3 under Procedure below. The build date is on the label of the CD player, and the software (SW) must also be either version 40 or 50 for this to work. SW version 42 will not work with this upgrade. Newer CD players can be found on eBay or anywhere else in the used parts market. You can install a newer CD player in a 2000, 2001, or 2002 model year vehicle, and you will get the same functionality. For vehicles with navigation, please follow this DIY.
DISCLOSURE: This post may contain affiliate links, meaning when you click the links and make a purchase, we receive a commission.
Procedure:
Remove the volume knob from your MID (display); it just pulls straight off.
Look in the hole where the knob used to be. At the bottom, you will see a small hole for a 2mm allen wrench. Insert one and turn it 1/4 turn counter-clockwise, and swing the MID out to the right of the vehicle and disconnect it.
Loosen the two screws that you can now see on the bottom edge of the CD unit. Note that they are captive, so you will just loosen these, not fully remove them. If you slide the CD unit out, you will see a sticker with the version number on it.
Plug in your aux kit to the rear of the CD player.
Plug the MID back in to test the auxiliary cable and make sure it works with your car. AUX will only appear on the display if there is a source (iPod, iPhone, etc) plugged into the other end of the aux cable. If it doesn’t work, double check the model and software of your CD player, as well as all electrical connections.
The BMW instructions that come with the kit tells the user to mount it in the glovebox. Others have mounted it in the cupholder area or other places, such as the little cubby under the armrest; this is up to you. Assuming you are mounting it in the factory location, the next step is to remove the glovebox. This is done by pulling forward on the black plastic trim/cover under the glovebox, unclipping the strut on the left side, and unclipping the nylon strap on the right side (open the glovebox to reveal these).
Now loosen the two 10mm nuts underneath, unplug the flashlight wire, and remove your glove box. This video on how to replace the glovebox strut gives you a good idea of how this is done. I would also recommend taking a small flathead screwdriver and prying down the glovebox light and unplugging it, as this will be on as long as the glovebox is not installed in the vehicle.
Using the image above as a guide, and the Auxiliary Input faceplate as a template, line up the right edge of the faceplate against the indentation in the glovebox wall indicated by the black arrow. Mark the center-point of these 3 holes with a punch or something similar.
Drill 2mm holes through all three holes in the template.
Bore out the center hole with a 10mm drill bit. Do this slowly and carefully.
Mount the faceplate to the inside of the glovebox using the provided screws.
Remove the panel that is behind the glovebox strut on the left hand side. It is held on by two Phillips screws; one is located behind the strut, so just swing that out of the way. The other screw is up slightly higher and to the left of the strut.
Take the auxiliary wire and route it down the right side of the radio plate. If you shine a flashlight into the area, you should be able to roughly see the path that the wire should take. It took a bit of messing around to get it routed correctly, but you have plenty of slack. Once the wire is routed as shown in the photo, run it below the pin at the rear left of the glovebox and insert it into the center hole of the faceplate, securing it with the nut provided.
You can now reinstall your glovebox panel, glovebox, CD player, and MID. Do not overly-tighten your 10mm bolts that hold the glovebox onto the rail; if the glovebox opens slower or not at all afterwards, loosen these nuts a bit.
Pull the excess cable slack back into the radio cavity.
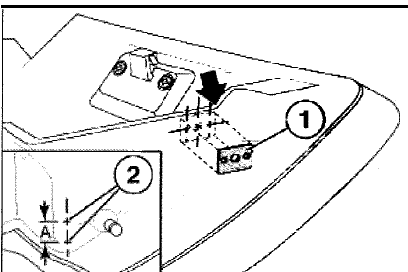
Illustration of aux faceplate installation on glovebox.
Volume:
If you find yourself cranking up the volume on your stereo to hear your music when using the Aux input, you can adjust the volume of the input by going into the Tone controls. There, you will find a setting to increase or decrease the volume. This helped substantially in my case where the volume was far too low in relation to other inputs such as radio or CD.
Overall, I am very happy with the way my install turned out. Leave a comment if you have any questions or comments about this DIY!
E39Source AUX Input Installation DIY for Non-Nav E39s